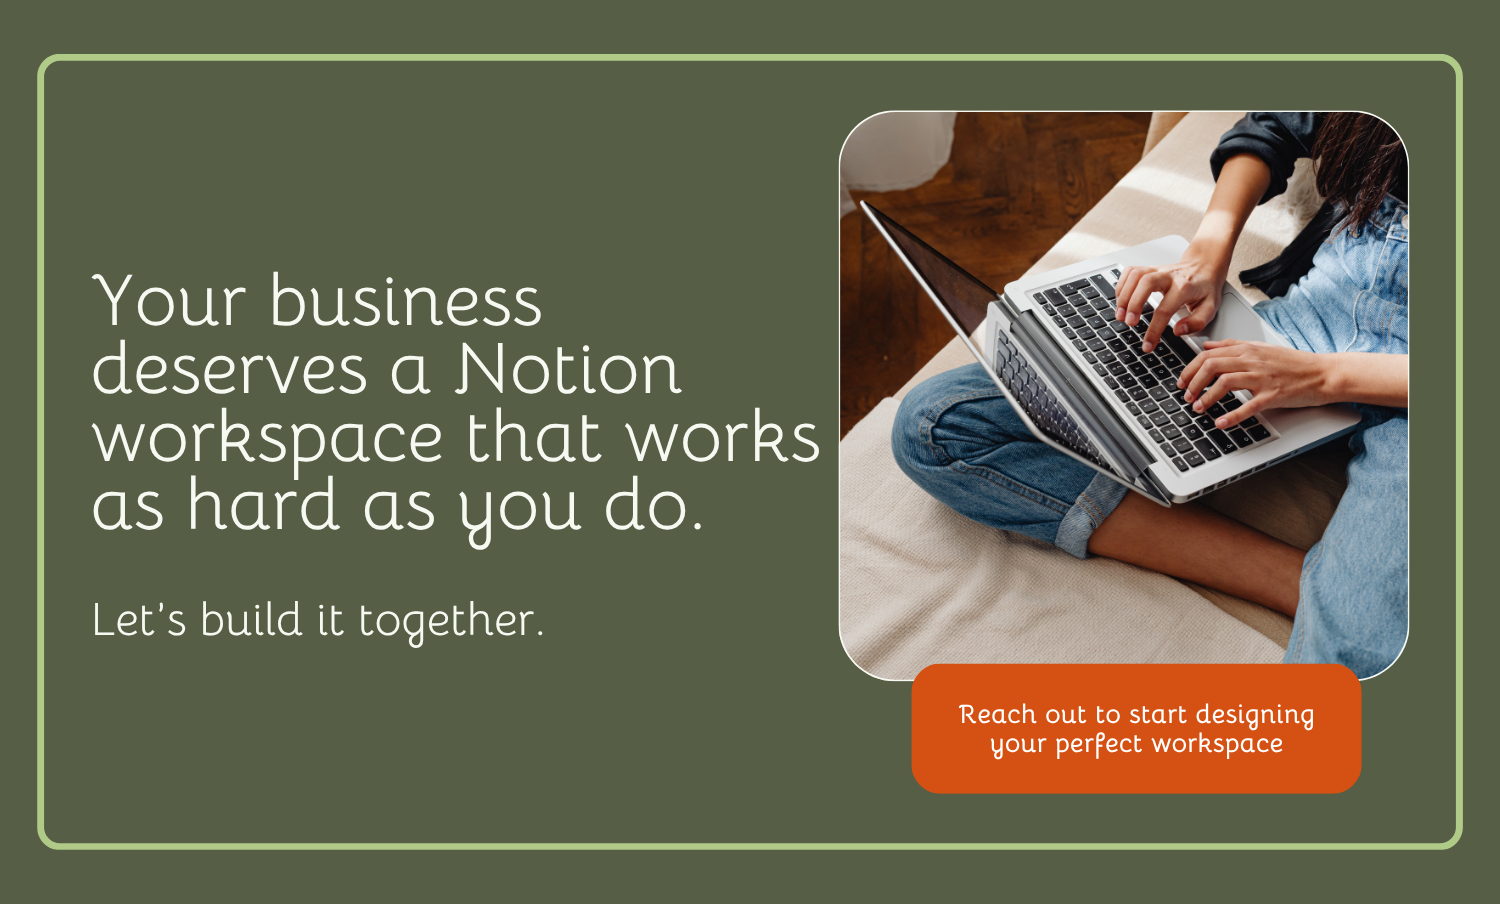
Notion 101: A Guide to Using It Effectively for Your Business
One of the most important things when running a business is staying organized. If you’re unorganized, things will get lost, deadlines can be missed, and clients will be unhappy. So how can you make sure that things are easy to find and ready for you whenever?
One of the best organizational tools to use is Notion. Notion is an all-in-one digital workspace where you can organize your thoughts, manage project details, build custom workflows, and so much more.
With a tool this powerful, it’s important to understand how to use Notion effectively so you can get the full range of benefits. So, if you’re ready to unlock Notion’s full potential, let’s dive into the basics and see how you can use it for your business.
Notion Basics
When learning how to use Notion, it’s important to understand its three basic elements that form the foundation of your workspace. These three elements are
The Sidebar
Blocks
Databases
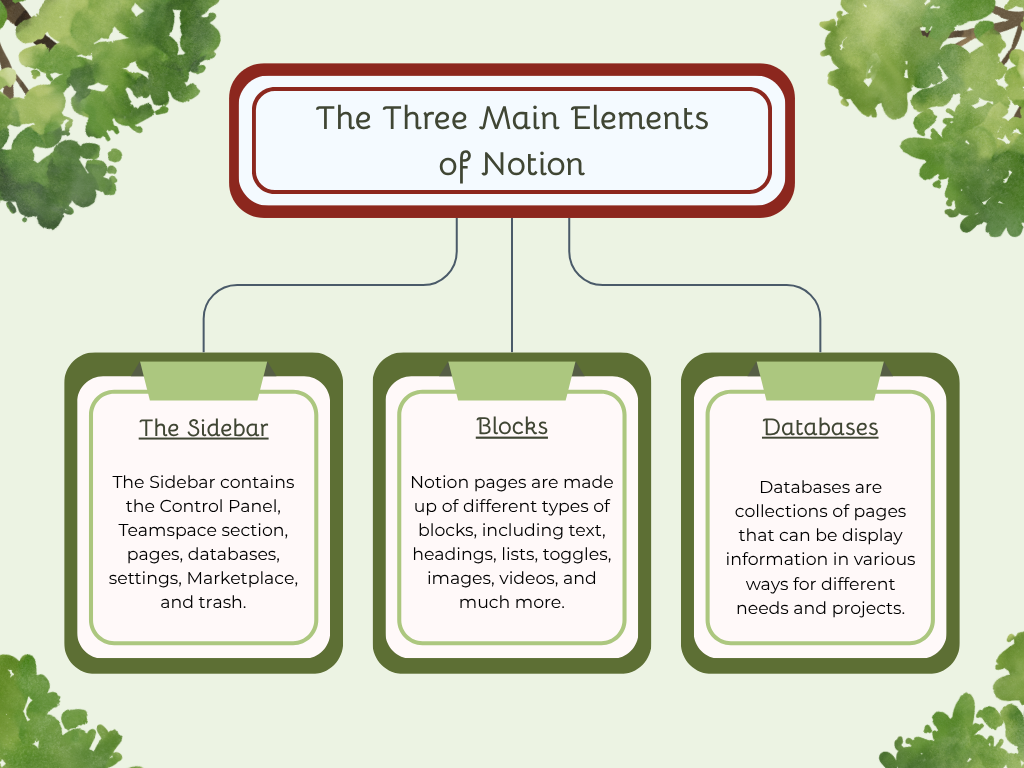
Each has its own unique purpose and features to help you stay organized and be as effective as possible.
The Sidebar
The first Notion basic is the Sidebar. This is located on the left side of your workspace and contains the control panel, all of your pages and databases, and the settings. Here you can reorder pages and customize it to your needs.
The Control Panel
In the Control Panel, you’ll find the workspace switcher, where you’re able to switch between multiple workspaces and accounts.
You’ll also find the search function, where you can look for your pages and databases by name or see recently viewed items. Easily find what you need by filtering results:
By best match, last edited, or date created
By the title only
By pages only created by certain people
By content that is only on other pages
By pages on a specific date or time frame
Under search is the home function, where you can view recently visited pages, learn about Notion from guides and videos, see upcoming events, select a database for easy access, and choose from various featured templates.
Next is your inbox, where you’ll see all of your notifications. These are organized by page and comment thread, so everything stays grouped together. You’ll be notified when someone mentions you, replies to certain comments, adds you to a Person property, or invites you to a page. Any reminders you or someone else set up will also appear here.
Teamspace Section
The Teamspace section is where you manage your teams or groups. This section can be customized for every team within your business. Teamspaces are only available to those on paid plans, so if you want to use it, you will have to upgrade your Notion plan.
Pages
This section has all of your pages, databases, and content within your workspace. The pages are broken down into three different groups: favorite, private, and shared.
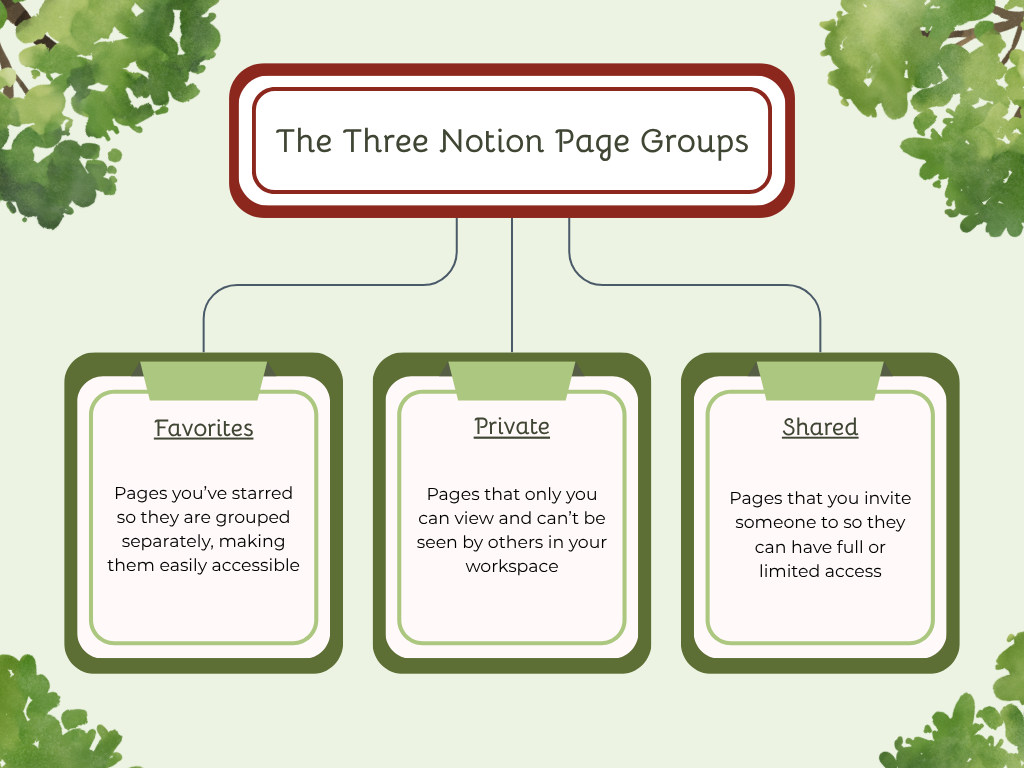
These three groups can be rearranged to best fit your needs by dragging and dropping them above or below the others.
Settings
The settings section is where you can set up preferences, manage notification settings, view connections and integrations, and customize your workspace. Invite and manage people or teams, view data on public pages, edit and add specialized emojis, and even import or migrate data from other apps and files.
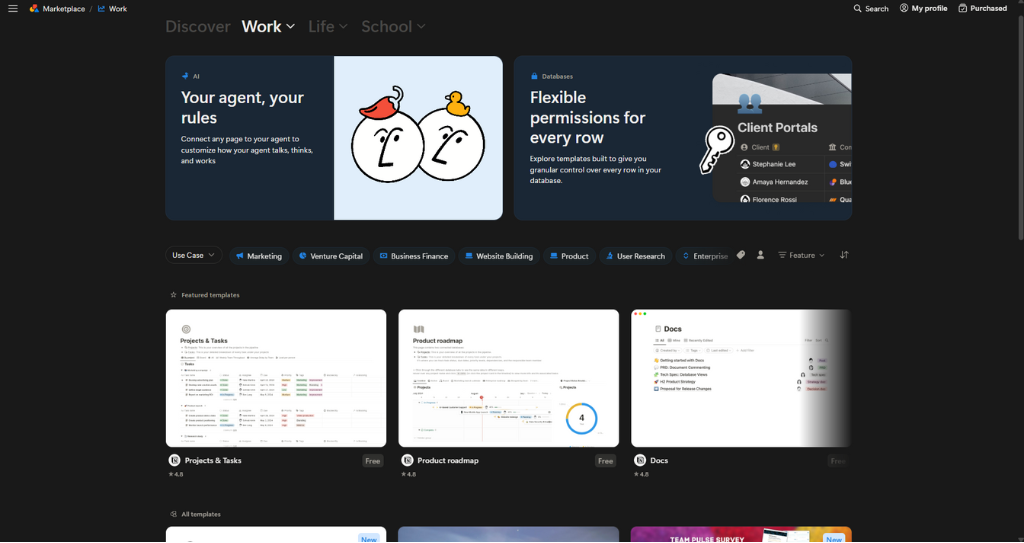
Marketplace
If you’re building something in Notion but aren’t sure how to start, the Notion Marketplace has you covered. With over 30,000 templates, it’s easy to find the perfect one. While there are paid templates, the free ones are ready to use with a click. Just add the template to your workspace and customize it to align with your brand and goals.
Trash
The last section in the Sidebar is the Trash. This is where your deleted pages are stored for 30 days before being permanently deleted. If you accidentally delete a page or change your mind, don’t worry. Find it in the Trash and hit Restore to bring it back to its last location.
Blocks
Understanding how to use Notion effectively means knowing which types of blocks to use for different purposes. Each block can be customized, edited, and rearranged by dragging and dropping it above, below, beside, or even inside other blocks to create a layout that fits your workflow perfectly.
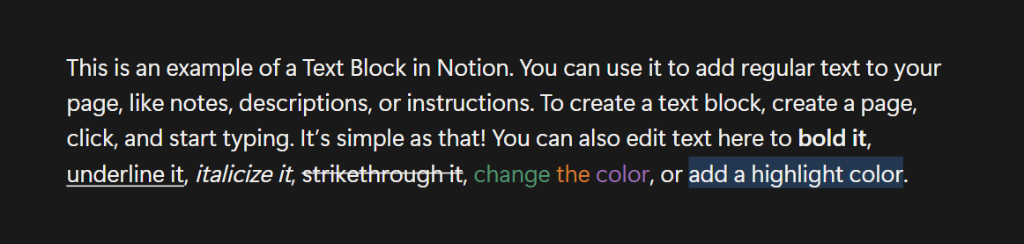
Text Blocks
Text blocks are the most basic type of block in Notion. They’re used for adding plain text to your page. When you open a new page and start typing, Notion automatically creates a new text block. You can format your text using standard editing options like bold, italic, underline, and more.
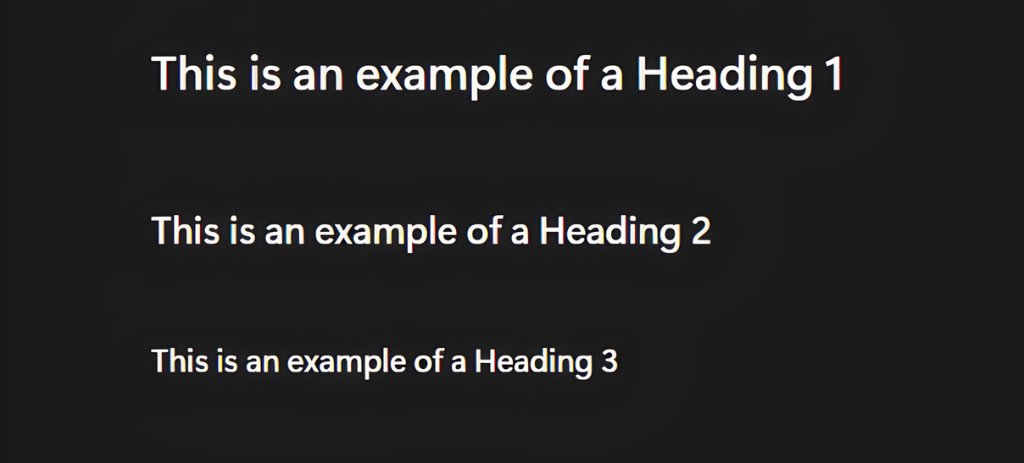
Heading Blocks
Heading blocks let you add titles and section headers to your page. You can choose from different sizes to break up your text into sections, making it easy for readers and collaborators to understand the material and stay on track.
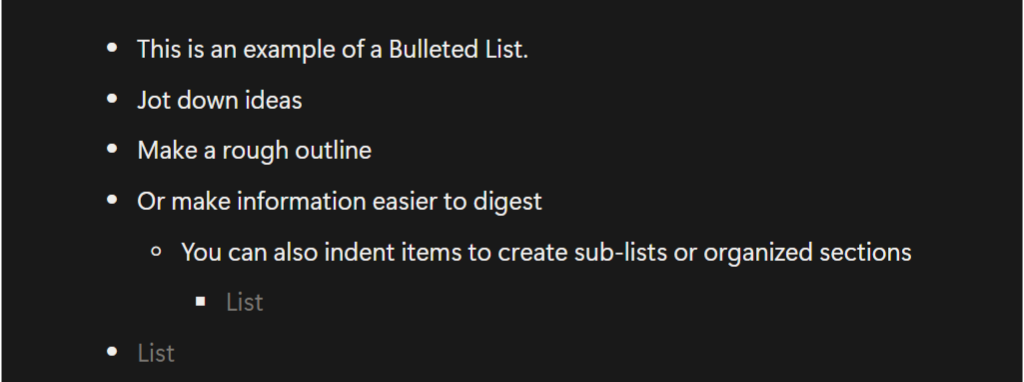
Bulleted Lists
Bulleted Lists are great for creating unordered lists of items. Jot down ideas, make rough outlines, group related items, or present information in a digestible format.
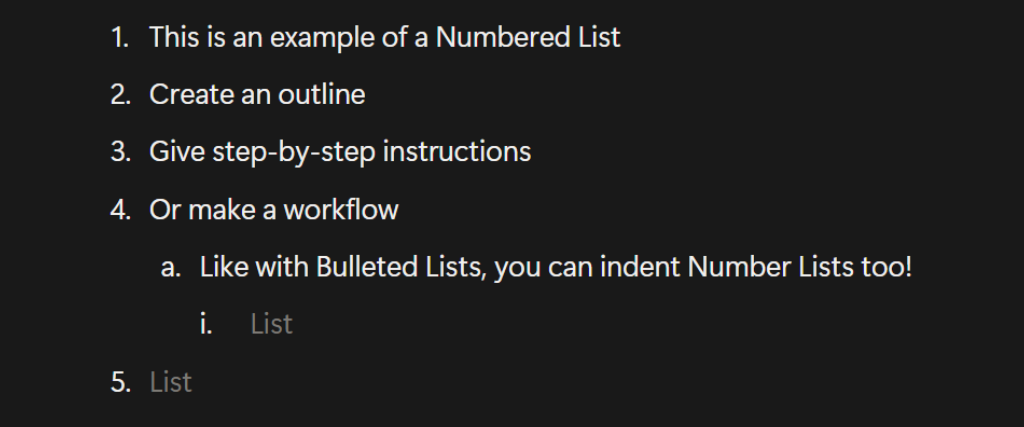
Numbered Lists
Numbered Lists are similar to Bulleted Lists, but they use numbers and letters to mark items instead of dots. These are great for items that are sequential or need to be in a certain order, like outlines, instructions, or workflows.
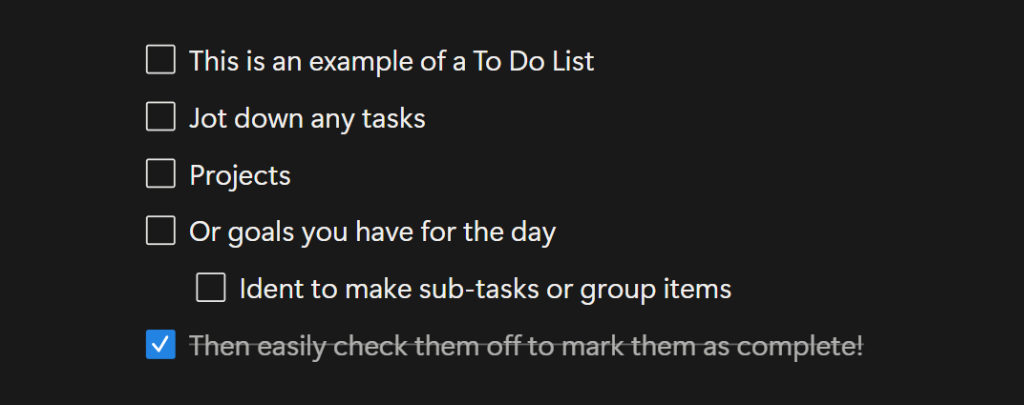
To-Do Lists
To-Do Lists are lists that have a clickable checkbox at the beginning of each line. You can mark items as complete with a single click, making them a great option for tracking tasks, goals, or small projects throughout your day.
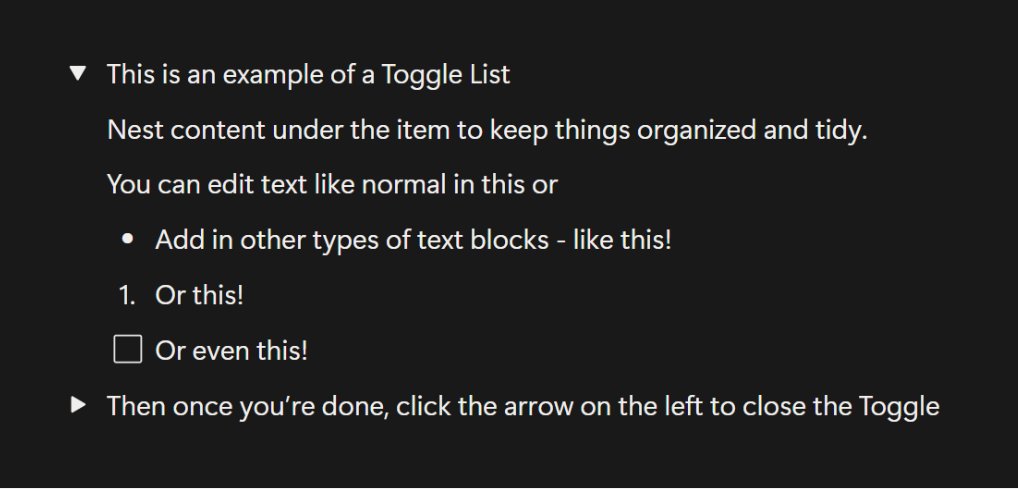
Toggle Lists
Toggle Lists are collapsible content blocks that can be opened to reveal nested information. You can nest text, lists, images, or other types of blocks within a toggle list. These are great for keeping long documents organized and from feeling overwhelming and cluttered.
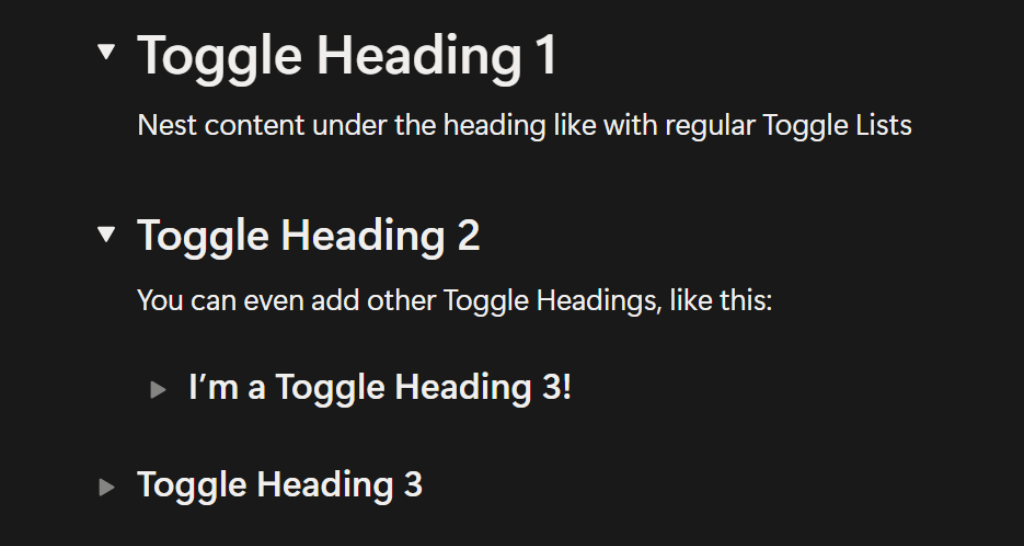
Toggle Headings
Toggle Headings combine Headings and Toggle Lists. They work exactly like a toggle list item does, but instead of normal text, they are shown in a Heading 1, Heading 2, or Heading 3 style.
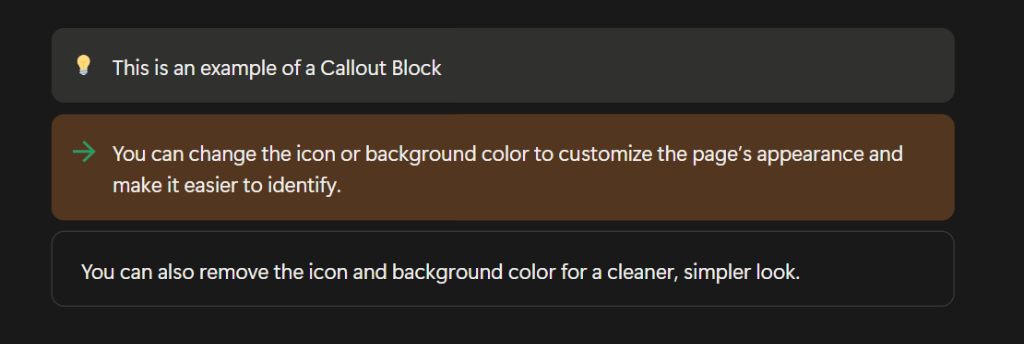
Callout Blocks
A Callout Block is great for drawing attention to specific text or breaking it out from the rest of a document. Callouts include an icon and background shading that you can edit or remove. You can even include other blocks within your Callout by dragging and dropping them within.
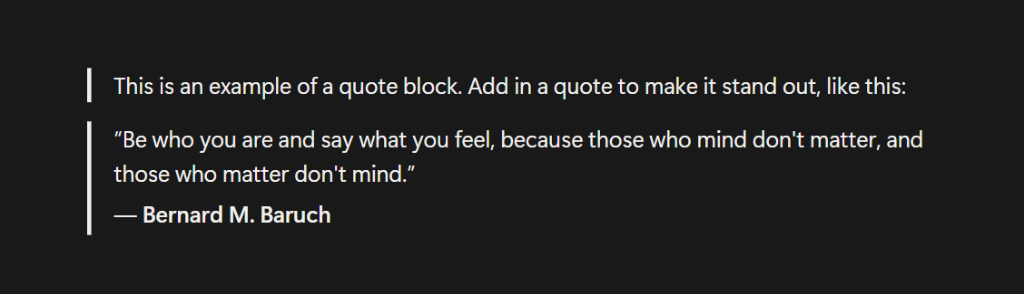
Quote Blocks
Quote Blocks are text blocks that are formatted with a vertical bar on the left and are indented slightly. Unlike Callout Blocks, there is no background shading or icon. This allows the text to stand out, so it highlights important statements, key insights, references, and other information in a simple and clean way.
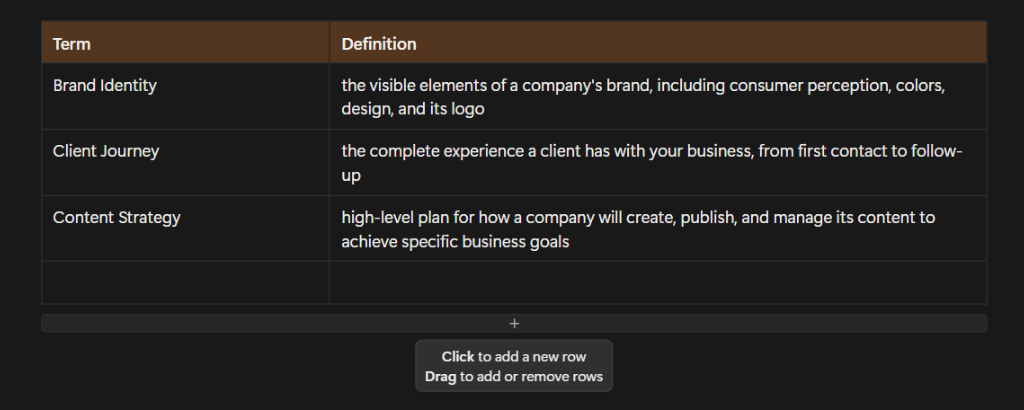
Tables
Table blocks are grids that are made up of rows and columns. These display data in a simple way and include only basic functions. You can still edit the text within them like you would with a normal Text Block, however. Create a header row or column, edit them to be different colors, add rows and columns, and move them with a click and drag to create the perfect table.
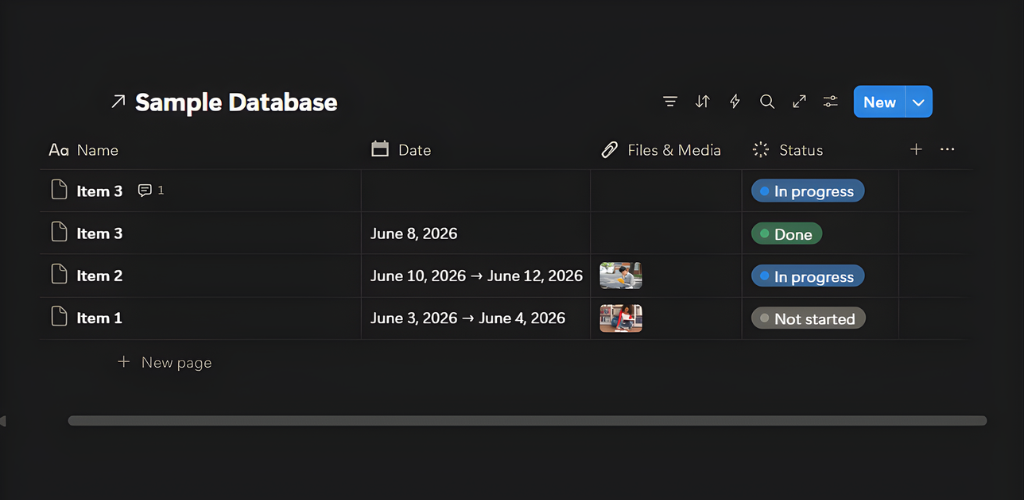
Databases
When learning how to use Notion, it’s important to understand one of the most powerful and flexible features it has to offer. Database Blocks are collections of pages that can be organized in different views for different purposes. They are similar to tables in that they display data, but Databases are more in-depth and complicated. You can add functions and properties to each page to filter, sort, and edit how the data is laid out. Since databases are one of Notion’s more advanced features, we’ll dive deeper into them a little later on
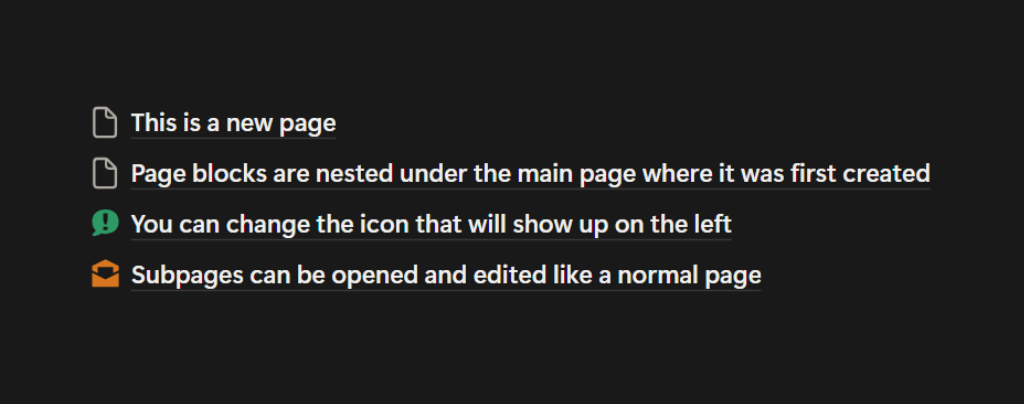
Page Blocks
Page blocks are subpages within a main page. This page will show up as a link with an icon and can be edited like any other with various types of blocks. When looking for this page in the Sidebar, it will be nested under the main page where it was first created.
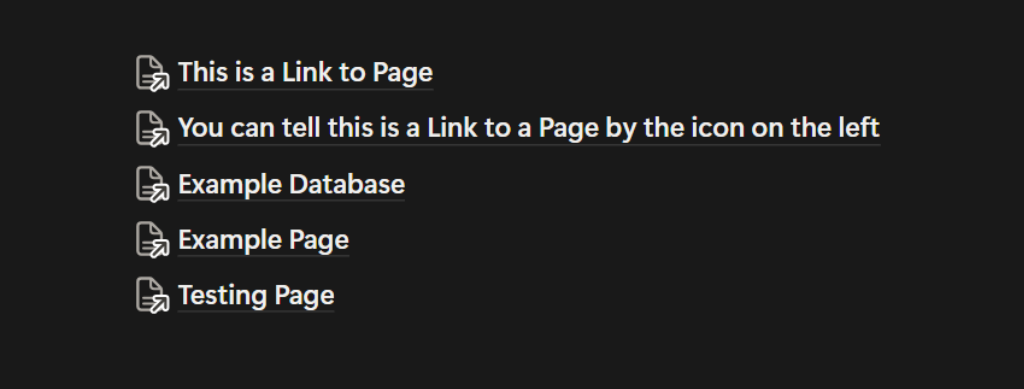
Link to Page Blocks
A Link to Page Block is similar to a Page Block, but the Linked Page has a home location somewhere else. Even though the home is somewhere else, the linked page will show as a full line and also appear in the sidebar under your current page. These are great to use for shortcuts to frequently viewed or related pages, so you don’t have to go hunting for them every time you need them.
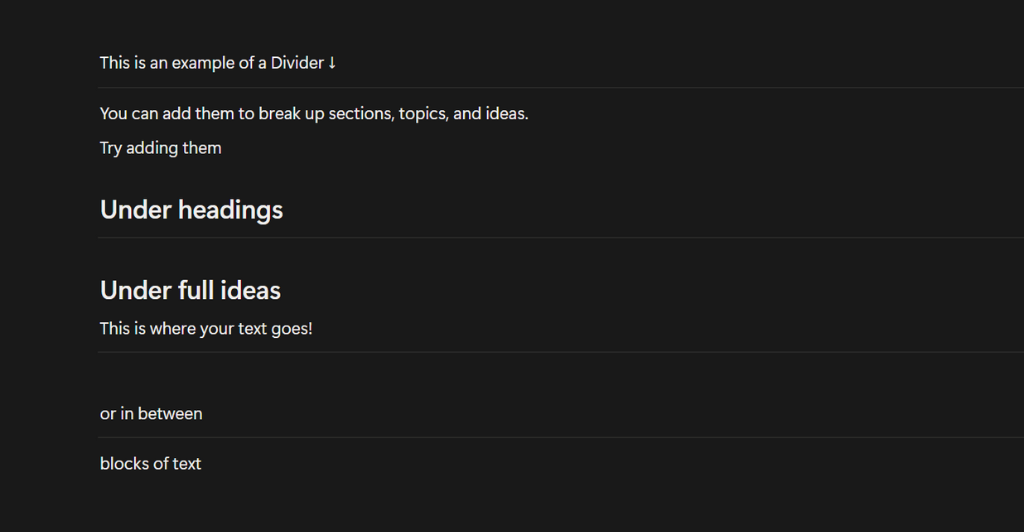
Dividers
A Divider Block is a simple horizontal line that is used to separate sections of content within a page. This can help to keep things organized and flowing nicely by visually breaking up different topics or ideas.
Media Blocks
Media Blocks are specific embed blocks that can be used to add images, videos, audios, code, files, or web bookmarks to your pages. These will show your media inline, so you can easily view them without having to leave the page.
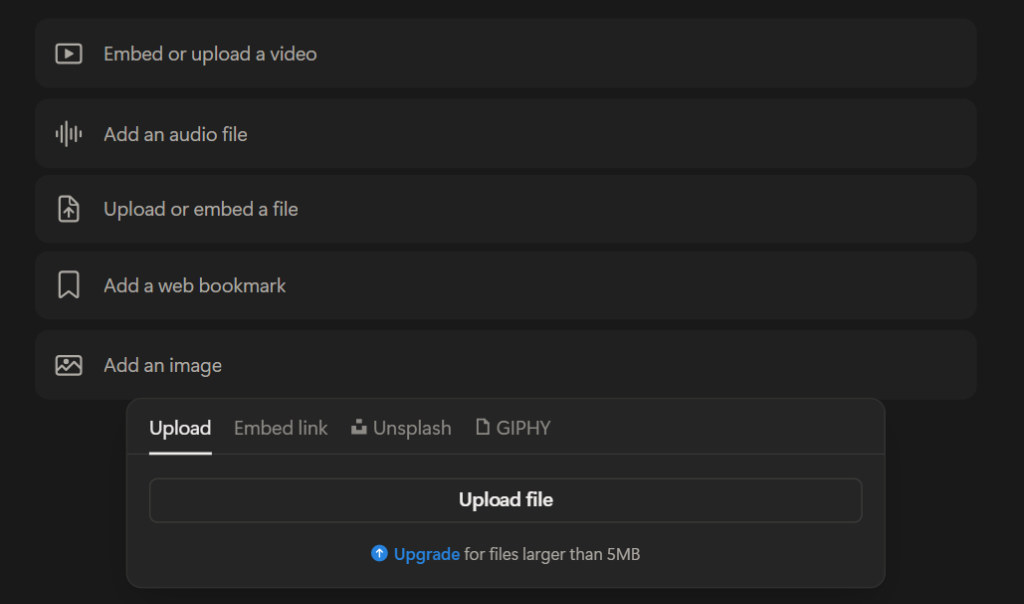
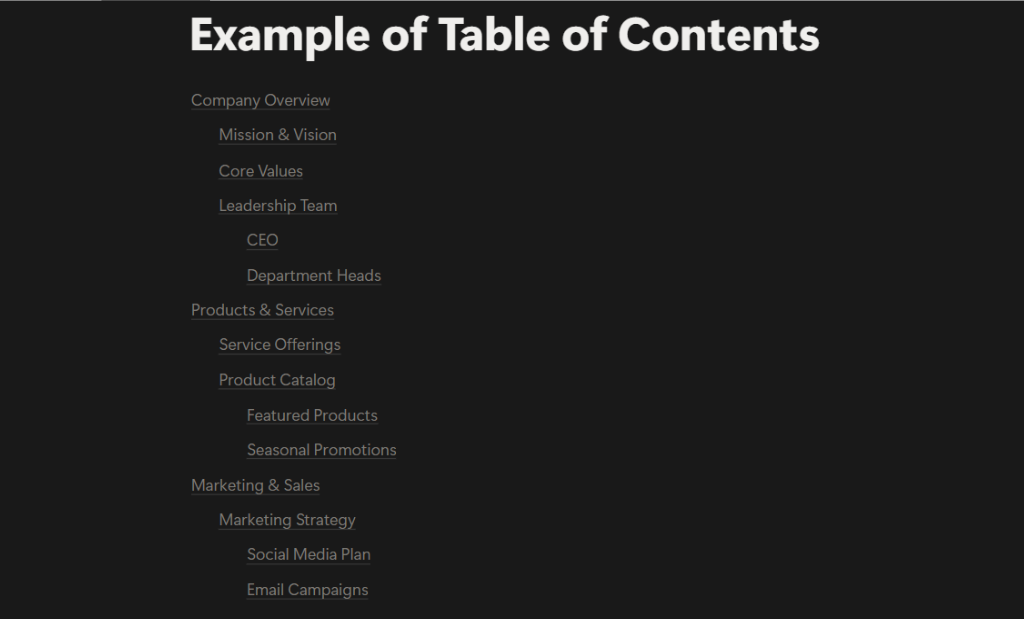
Table of Contents Blocks
Table of Contents Blocks are great for long documents with multiple headings and sub-headings. When you select this block, a list of anchor links to the headings within the page will be automatically generated and placed at the top of the page.
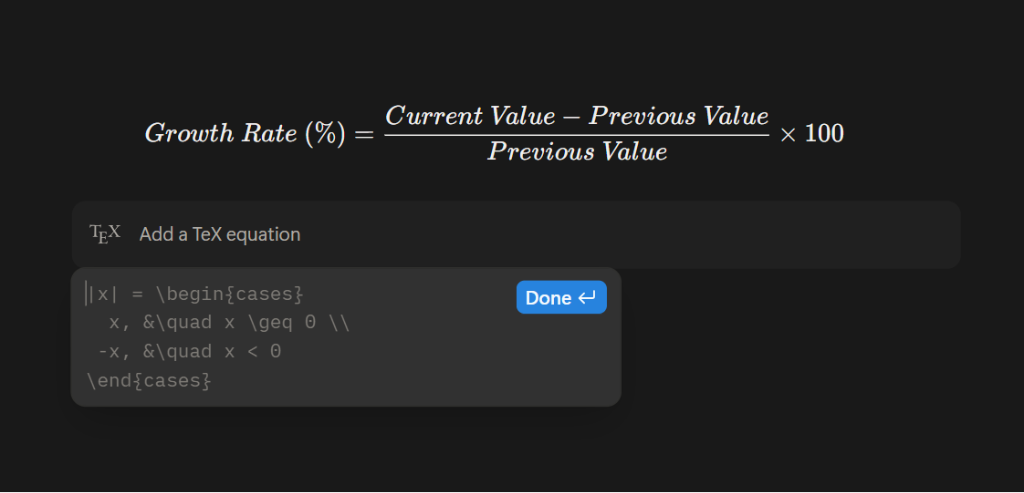
Block Equations
Block Equations allow you to display mathematical characters, expressions, and equations as a block or inline. Notion supports the \KaTeX language, so all symbols and operations that follow it will work.
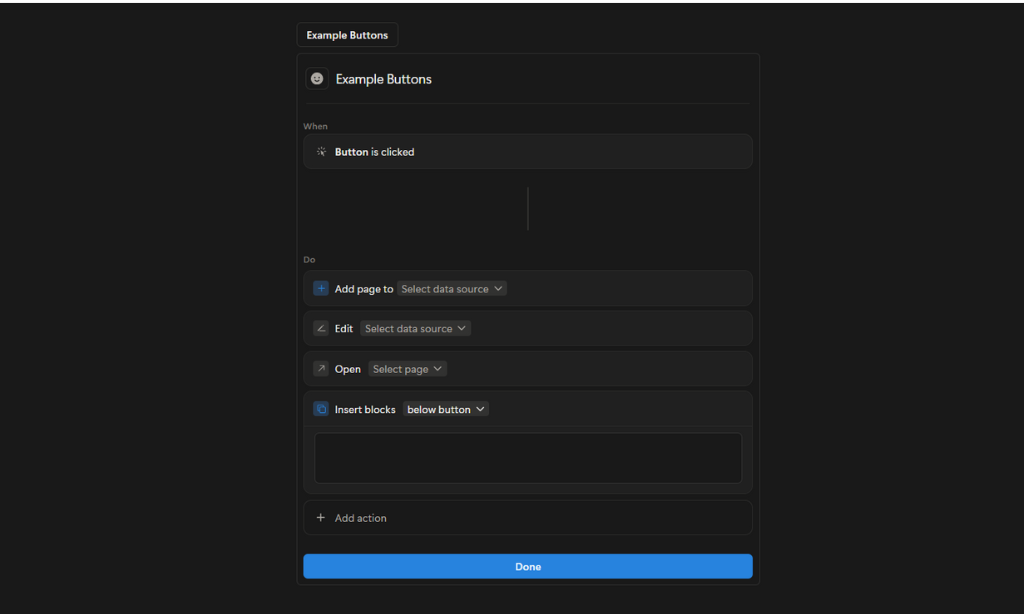
Buttons
Buttons allow you to complete actions with a single click. You can set them up to automate any repetitive task you may have to save you time and stress. Insert blocks, add pages, edit pages, open a page or URL, and more with buttons.
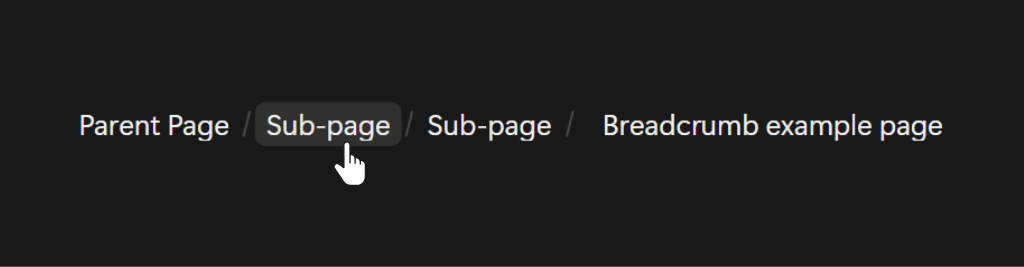
Breadcrumbs
When you add a Breadcrumb block, Notion automatically generates a navigation menu that shows where your current page sits within your workspace. This menu shows each page leading back to the main parent page, helping you understand the page’s structure. You can click on any page in the breadcrumb trail to jump directly to it.
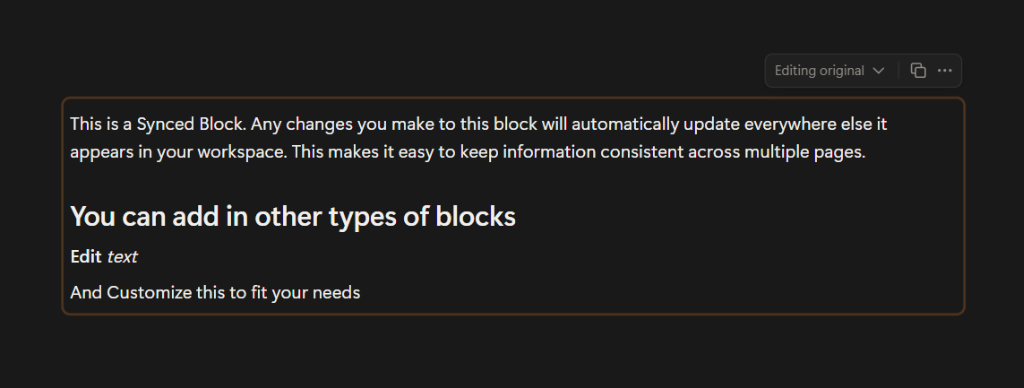
Synced Blocks
Synced Blocks allow you to copy a block of content and place it on another page in your workspace. However, unlike a normal copy and paste, any changes made to one block will automatically change it across all locations where it appears. This is great if you need the same information across multiple sections. You only have to update it once, and the changes will appear everywhere. You’re also able to see where the original block is and all other locations where it’s used.
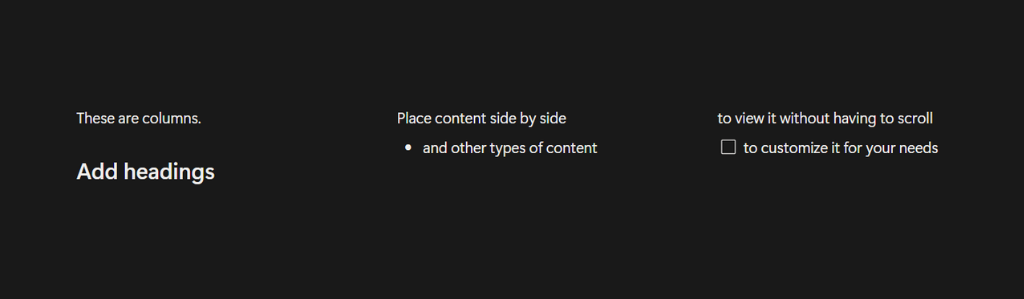
Columns
If you want to view multiple pieces of information without scrolling, Columns are for you. You can add columns before typing, or drag and drop a block to the left or right of another to place them side by side. While you can only add 5 columns from the block menu, you can drag and drop as many as you like across the page.
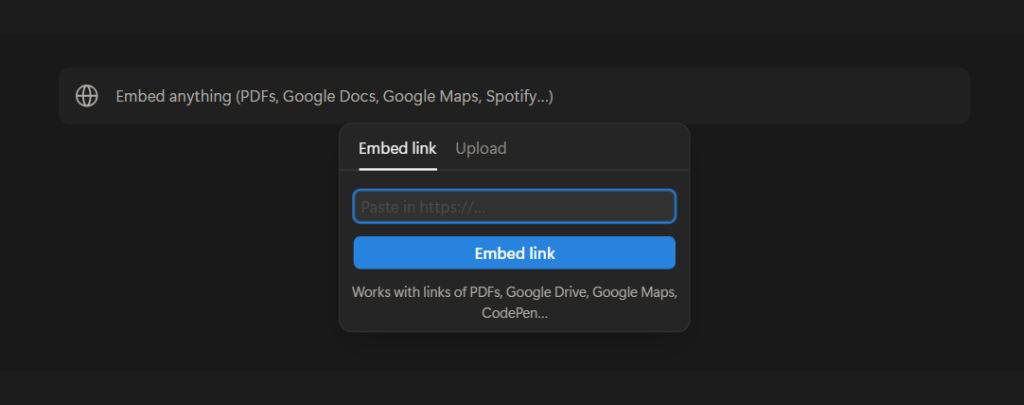
Embeds
Similar to Media Blocks, Embed Blocks allow you to add various types of embeds from apps, PDFs, forms, maps, and more. When you add an Embed, you’ll be able to view the content right from the Notion page. Notion has preconfigured blocks for some of the most commonly used types, but you can add just about any type of webpage or online content that you want.
Databases
As mentioned above, Databases are collections of pages that can be organized and viewed in a variety of ways. Make your database a full page or add it as an inline to another. Each page within your Database is fully editable and customizable like a normal Notion Page.
Properties
One of the best things about Databases is the properties. You can use these to add context, filter, sort, and search your data. Add as many as you need and customize them to fit your goals. Database pages can include properties such as:
Text - normal text that can be edited
Number - numbers that can be viewed as regular numbers, currency, percentages, or progress bars
Status - drop-down menu that allows you to track your progress by selecting to-do, in progress, or complete tags
Select - drop-down menu that allows you to choose a single option
Multi-select - drop-down menu that allows you to choose one or more options
Date - date or date range
Checkbox - a simple checkbox
Formula - calculations based on other properties
Relation - connect to other databases and mention database pages
Rollup - view and aggregate info about properties from the relation properties
Person - tag a person or group
File - upload files and images
URL - link to a website/webpage
Email - email address that, when clicked, will open your email and start a message to that address
Phone - phone number that, when clicked, calls the number
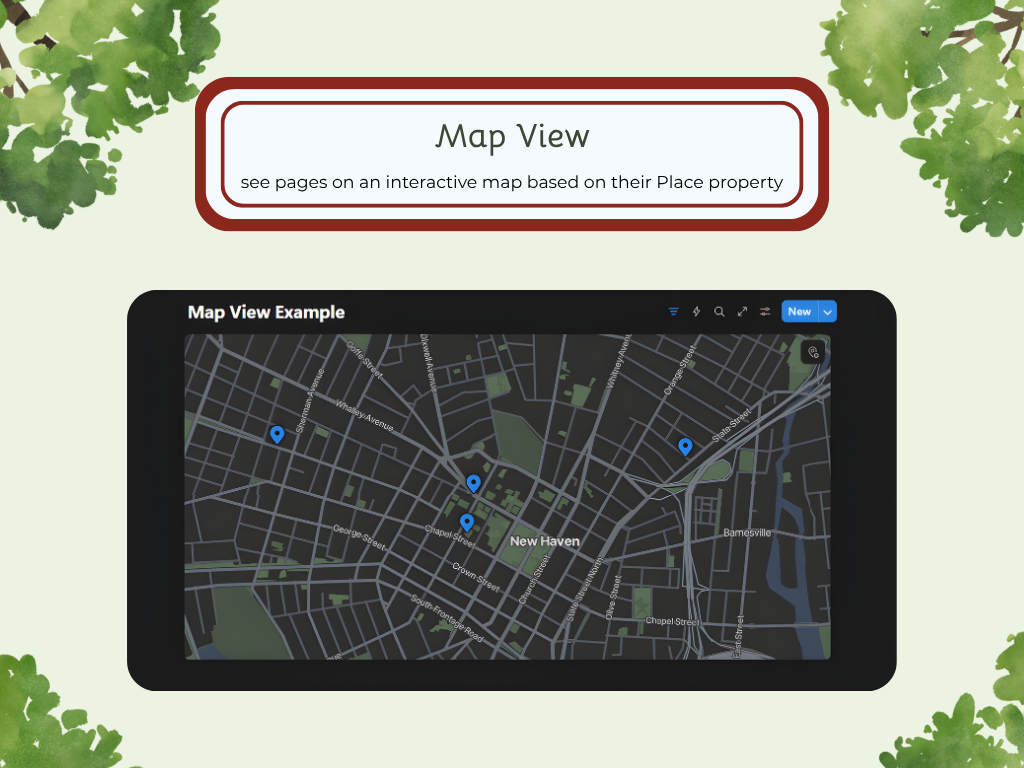
Place - physical location on a map
Created Time - records the timestamp of when the page was created
Created By - records who created the page
Last Edited Time - records the timestamp of the last edit
Last Edited By - records the last person who made edits
Button - automates specific actions within the page
ID - unique numerical ID for the item
Once you’ve selected the various properties you want to use, it’s time to figure out how you want to showcase the data.
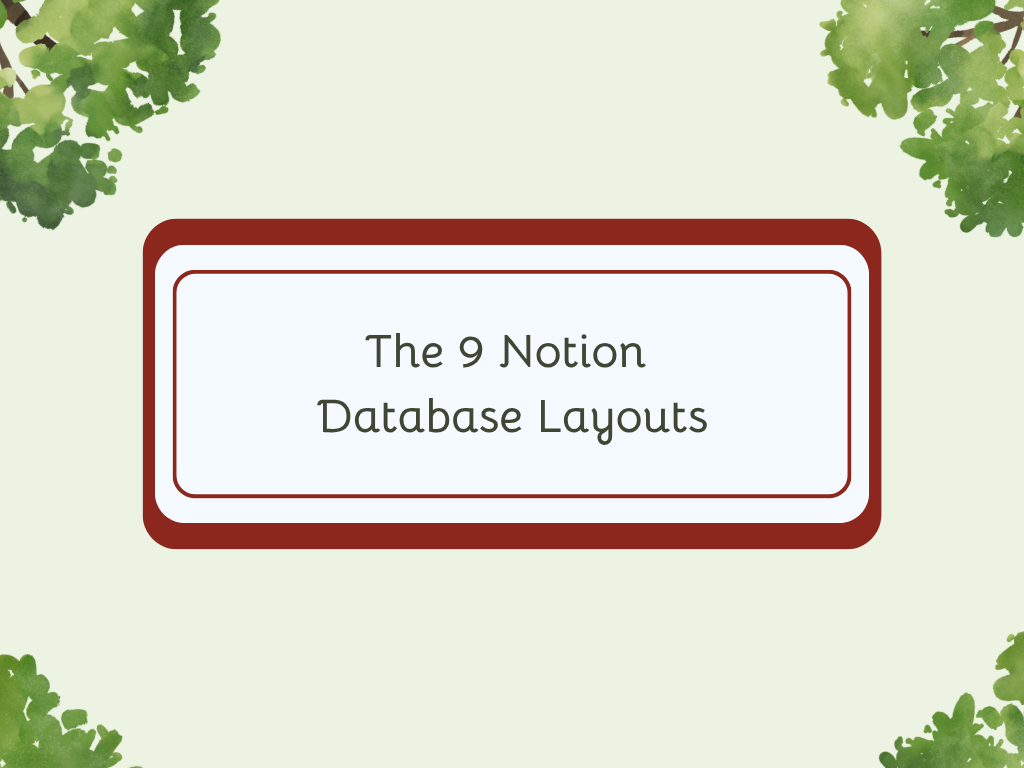
Database Layouts
There are a variety of ways you can choose to lay out your data. Each layout has its unique purpose and use, so depending on your goals and project, you can find one that fits perfectly. The Database Layouts are:
Table
Board
Gallery
List
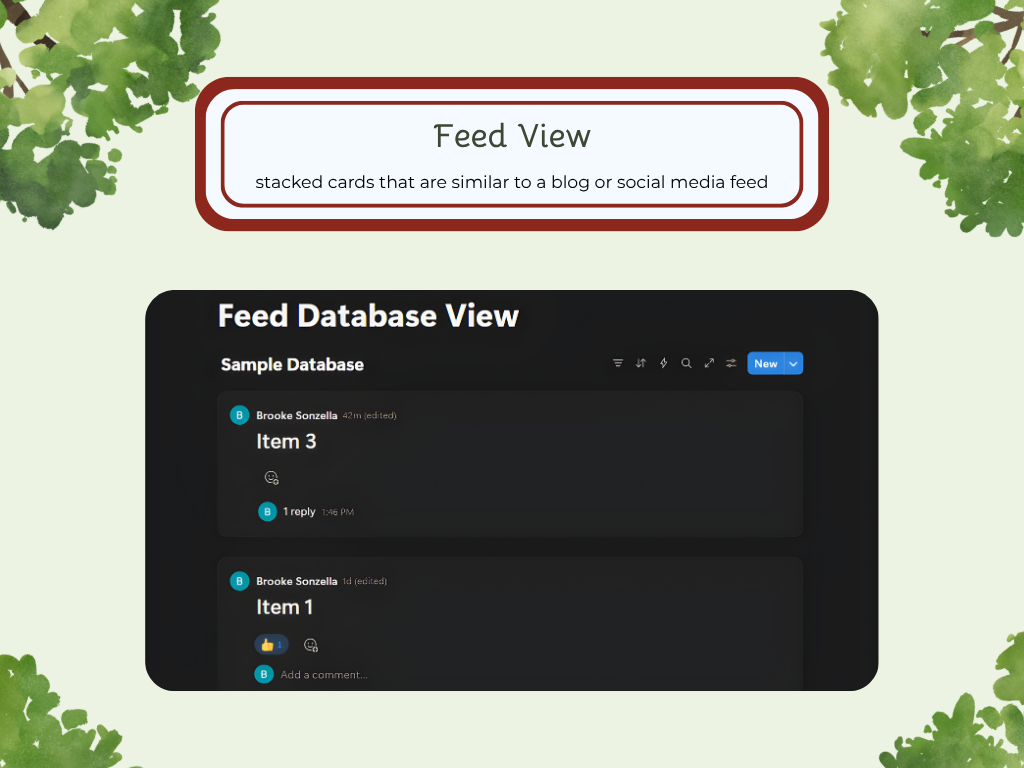
Feed
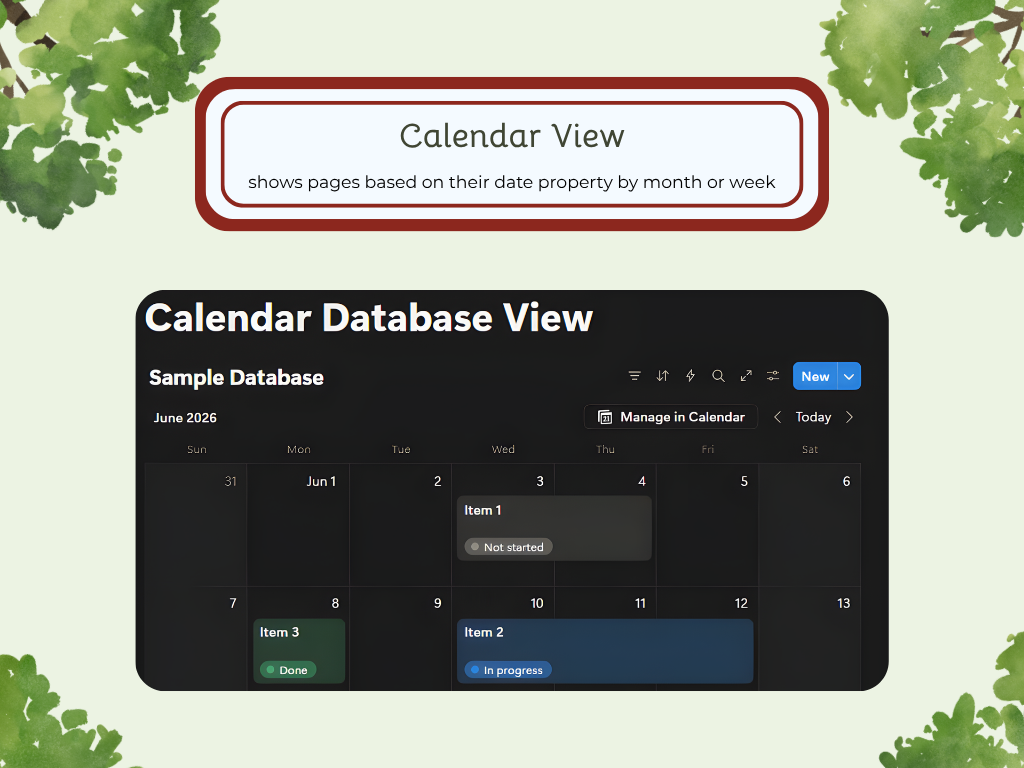
Calendar
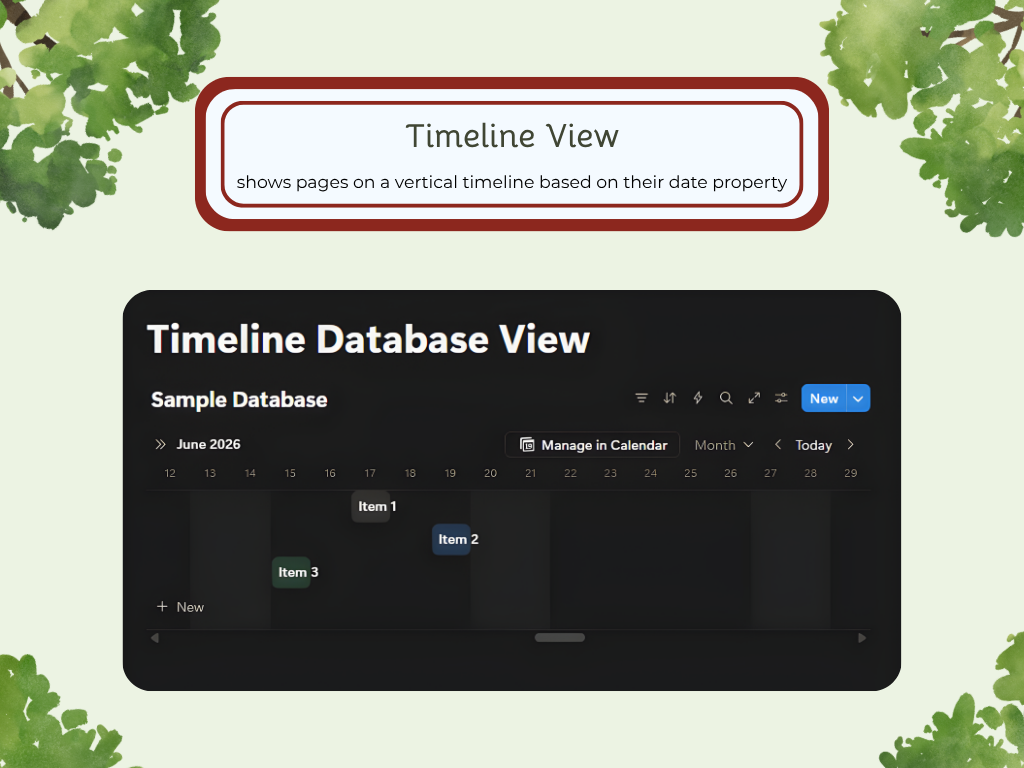
Timeline
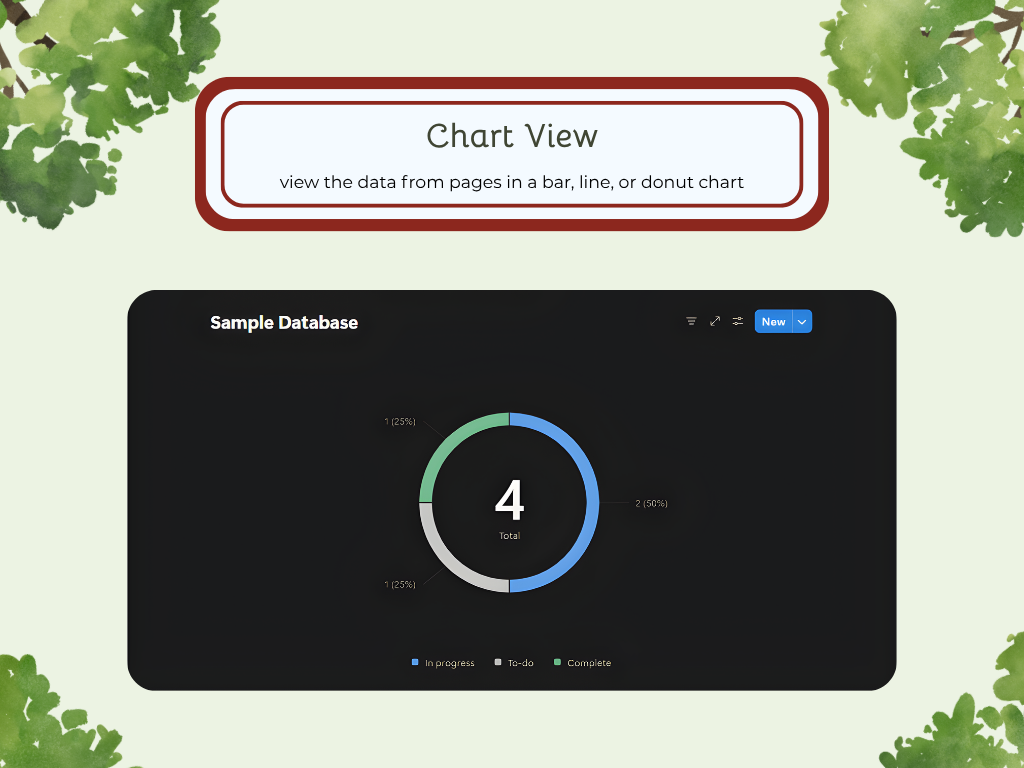
Chart
Map
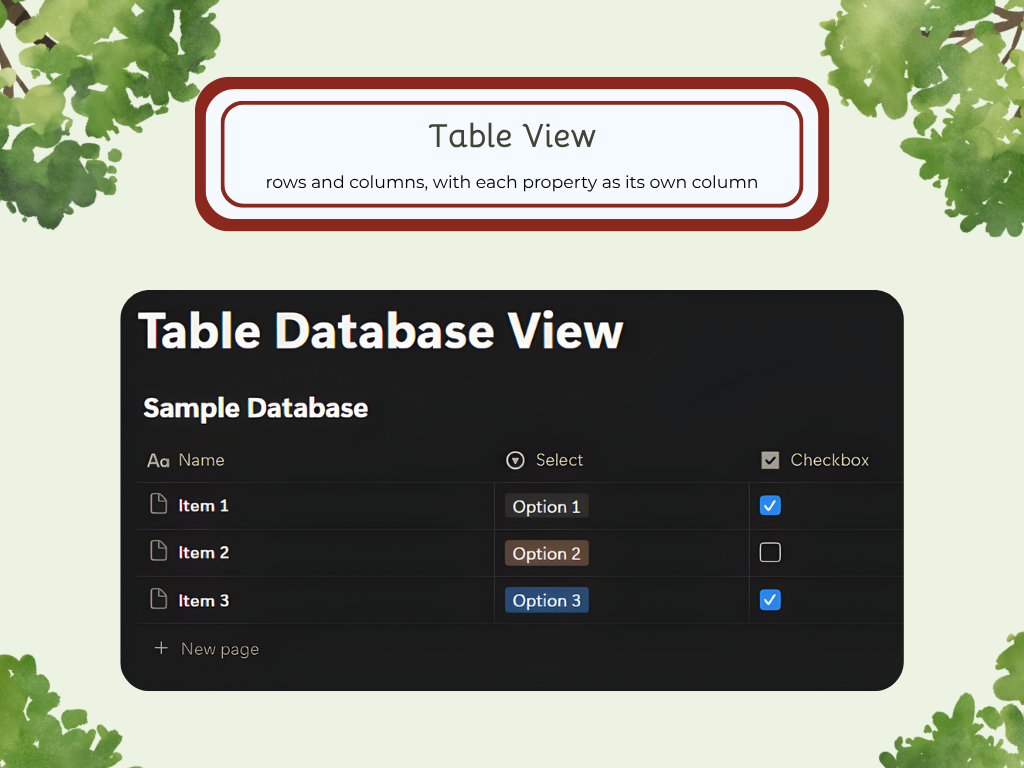
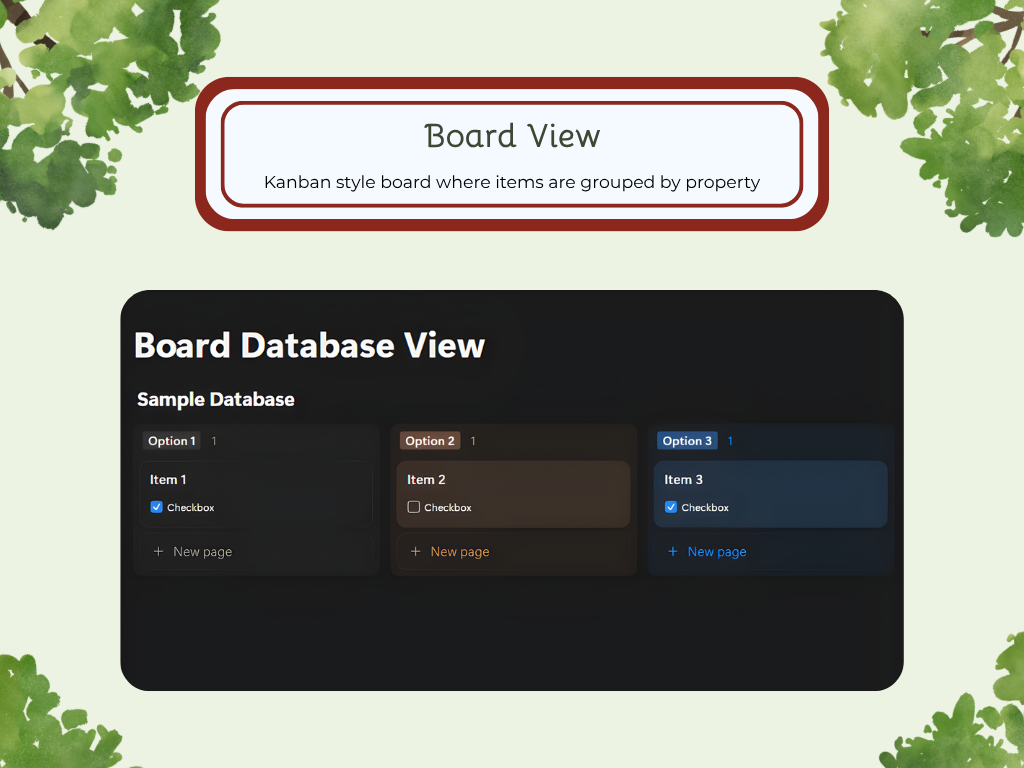
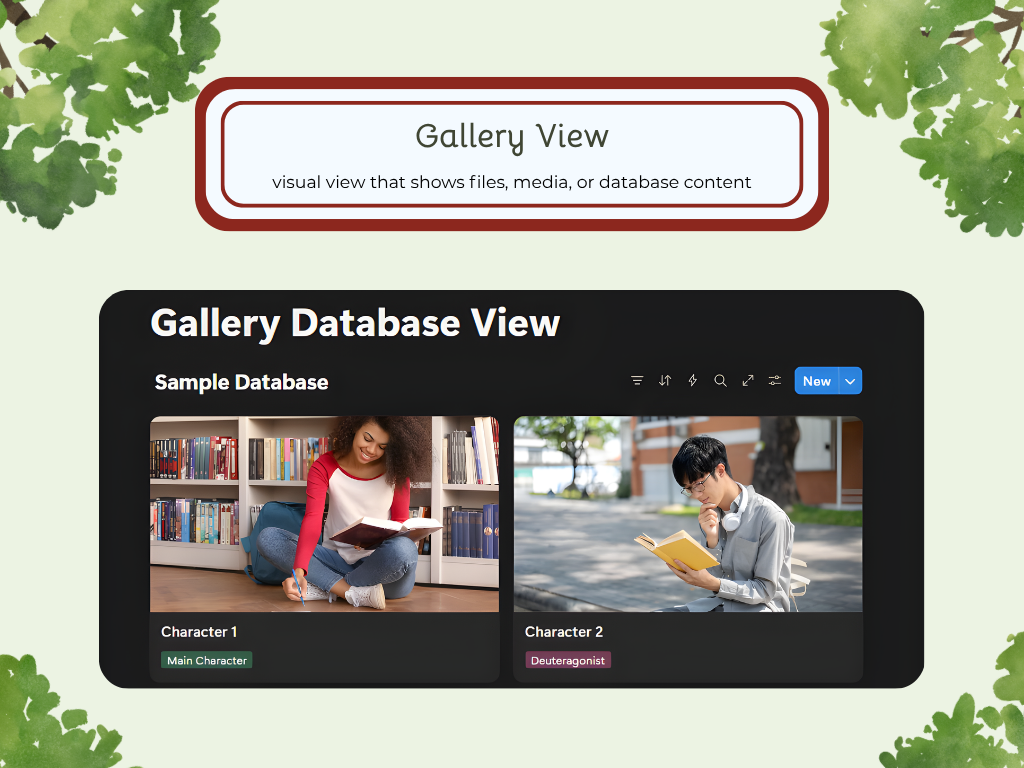
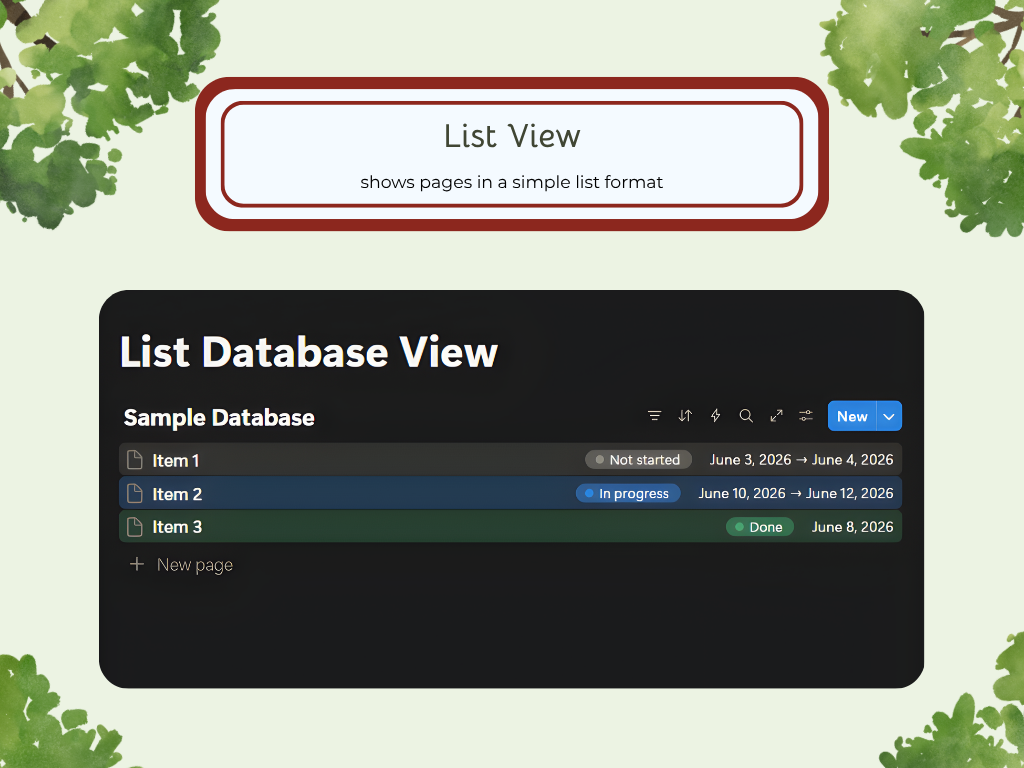
You can create multiple views for a single database and customize the layout for each, allowing you to see all your data in the way that works best.
Database View Settings
Within Database Views, you can further customize each view using its settings. While some options may not be available for every database type, the main settings you can use are:
Layout
Property Visibility
Filter
Sort
Group and Sub-Group
Conditional Color
Full-Page Database vs. Inline
Depending on how you want your database to be set up, you can choose to show it as a Full-Page or an Inline. Full-page databases contain only the database, so you can focus solely on it, while Inline databases can be tucked into other pages with other types of blocks. When you create an Inline database, it appears in the Sidebar menu at the location where you added it, while full-page databases appear as their own pages in the menu.
Linked View Databases
Similar to Synced Blocks, Linked View Databases are synced copies of the same database in other locations. While the content is synced and will change when edited, the filters and views are specific to the current location, so those will not. This is great when you have a large database with information that relates to many different projects or tasks.
Forms
Notion Forms make it easy to gather information and organize it. They are connected to databases, so when someone fills out the form, the responses are organized directly into the proper field within the assigned database.
You can customize all aspects of the form, including choosing who can fill it out, whether responses are anonymous, and any automations that trigger specific actions. Choose to make it available to anyone at your workspace with the link, anyone on the web with the link, or no access. If you choose anyone on the web, the form will automatically be anonymous.
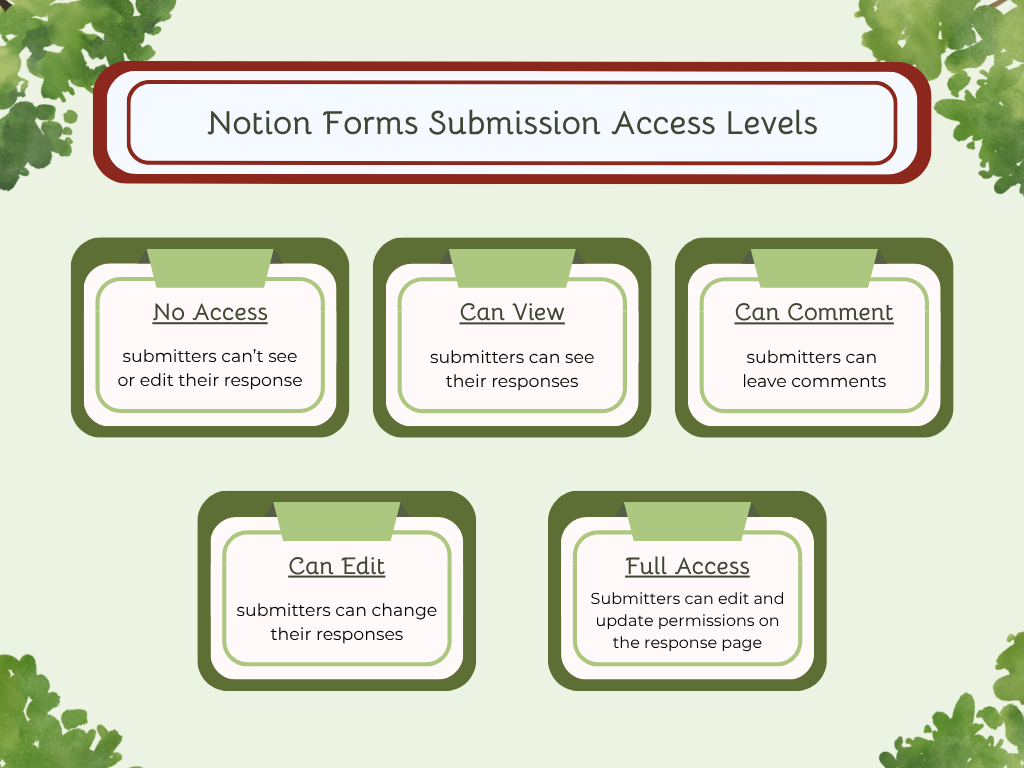
You can also edit the access to submissions. Choose between:
No access
Can view
Can comment
Can edit
Full access
Forms can be used by anyone who has a Notion plan, regardless of whether they’re part of your workspace or not. Share your form by copying the link at the top of the menu and sending it to the applicants of your choice.
Conclusion
Notion is a powerful tool that can help you stay organized, streamline workflows, and keep all your business information in one place. By understanding the basics, you can start building a workspace that fits your needs and grows with your business. Try out different block types, database layouts, and views to see how Notion can fit almost any workflow or project in your business.